You'll love the added safety and convenience of grab bars--and you can install them in a few hours.
By Jeff Gorton
From FORON Serives
January 2005
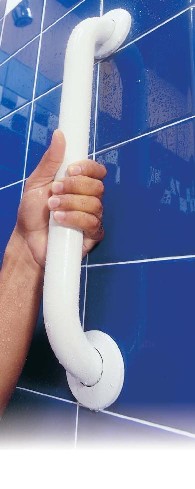
 Grab bars aren't just safety devices for hospitals and public restrooms. In your own home, a strategically placed and solidly anchored grab bar can mean the difference between a relaxing bath and a trip to the emergency room. Grab bars aren't just safety devices for hospitals and public restrooms. In your own home, a strategically placed and solidly anchored grab bar can mean the difference between a relaxing bath and a trip to the emergency room.
In your bathtub or shower, grab bars provide extra security for that first slippery step. In this article, we'll show you where to position grab bars and how to anchor them so they're rock-solid.
If you've mounted towel bars or other hardware around the house, you'll have no trouble installing grab bars. It shouldn't take more than a few hours. You'll only need a hammer, a level, a drill and a few special drill bits. A stud sensor is optional.
Your Grab Bars Will Be Rock-Solid If You Anchor Them To The Studs
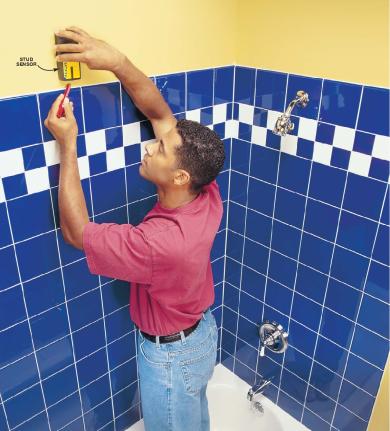
If you're mounting your grab bars to standard wood-framed walls, first you'll have to precisely locate the vertical framing members called studs (Photos 1 and 2). Most grab bars have three screw holes in each mounting flange, but you'll only be able to anchor two of the three screws into a typical 1-1/ 2 in . wide stud. Use a plastic anchor for the third screw. As long as these screws penetrate at least an inch into sound wood, the grab bar will meet or exceed the 250-lb. load rating required by the government for public buildings. More important, it will be plenty strong to support you even in a fall. We'll show you how to mount grab bars to fiberglass tubs and showers, hollow walls and concrete.
Studs are easy to find in walls with only a single layer of drywall over the framing. Rap on the wall with your knuckle until the sound changes from hollow to a dull thud, or use a stud sensor (Photo 1). Thicker wall coverings like plaster present a greater challenge. Here are a few tips:
- Remove the access hatch behind the tub drain and peer behind the tub with a flashlight to look for studs.
- Go to the room or closet behind the long tub wall and look for clues to stud locations like nails in the baseboard. Then measure from a reference point you can identify when you go back into the bathroom.
When you've located what you believe to be the center of the studs, confirm the stud locations and find both edges by probing with a nail (Photo 2). If wall tile extends to the ceiling, drill 1/8-in. holes with a glass-and-tile or masonry bit in a horizontal grout line instead. Patch the holes later with matching grout or caulk.
Mark the studs and grab bar mounting holes (Photo 4). Then drill a 1/8-in. hole at one of the marks located over a stud. If you miss the stud, adjust the grab bar location accordingly and drill new holes. In most cases, the unused hole will be covered by the mounting plate on the grab bar.
Complete the grab bar installation as shown in Photos 6 and 7. Use a 1/4-in. glass-and-tile or masonry bit to enlarge the holes. Then use a 5/32-in. wood bit to drill pilot holes into the stud. This will make driving the screws easier.
Insert a plastic anchor in the holes in the tile that miss the stud. Then screw the bar to the wall with No. 10 or 12 stainless steel pan head screws. Make sure the screws penetrate the studs at least 1 in . In most cases, 2-in. screws are long enough.
Positioning Your Grab Bars
Even a solidly anchored grab bar is useless if it's in the wrong place. What location is best depends on the particular situation. If you're installing the bars for a person with a disability or injury, have this person help you decide which location will be most helpful. A physical therapist or an occupational therapist also can help with this decision. For solid anchoring, stud locations are critical too. (Later we'll tell you what to do if studs aren't available.)
Here are guidelines for placing the bars:
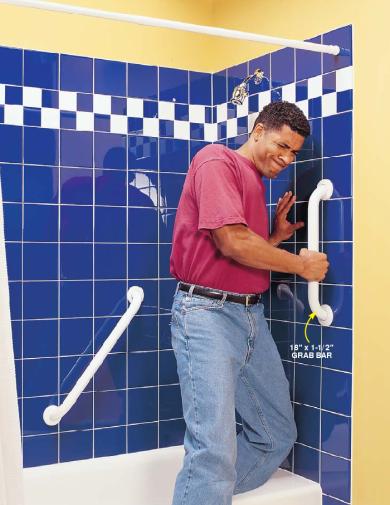
- Place an 18-in. to 24-in. long bar vertically at the tub edge (Photo 8) to assist in getting in and out of the tub. The bottom of the bar should be 32 to 38 in . above the floor. Position the bar so it can be anchored to a wall stud.
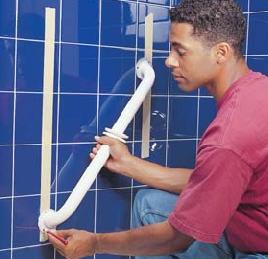
- Mount a bar at an angle between two wall studs on the long back wall of the tub (Photo 7). The bottom of the bar should be about 6 to 10 in . above the top of the tub. For studs 16 in . apart, a 24-in. long bar provides a nice angle. A person can use this grab bar to help lower himself and get up again. If this bar will be used primarily by a person sitting in a bath chair, raise the bottom to about 18 in . above the tub.
- Mount a bar horizontally about 36 in . to 38 in . above the bottom of the tub as a convenient handhold while showering.
If you simply can't anchor to a stud, you have a few options. The best alternative is to secure wood blocking between the studs. However, this requires opening a small hole in the wall and patching it after the blocking is screwed into place. If possible, work from the backside of the tub wall, where you're not hindered by ceramic tile or other tub finishes. If you're lucky, you'll have a closet or storage area where the wall patch doesn't have to be perfect.
As a last resort, use toggle bolts or WingIts to mount the grab bar to the hollow part of the wall. The plaster, mortar or tile backer must be dry and solid and at least 5/ 8 in . thick.
Special Anchor For Fiberglass Enclosures
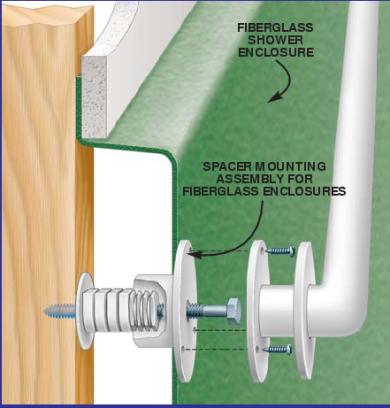

The Solid Mount solves the fiberglass shower problem. Fiberglass tub and shower enclosures present a unique challenge. You must mount the grab bar to a stud, but the space between the stud and fiberglass must also be filled with something or the fiberglass will bend as you tighten the mounting screws. The Solid Mount, available for about $30 by mail, solves the problem. See the Buyer's Guide for information on how to order.
Special Toggle Bolt For Hollow Walls

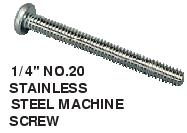
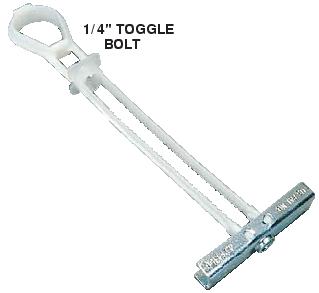
Toggler brand toggle bolts work great for hollow walls or steel studs. If you simply can't mount your grab bar to a stud or solid wood backing, then these Toggler brand 1/4-in. toggle bolts are the thing to use. Follow the instructions on the package to mount the toggle. Then use a 2-in. x 1/4-in. x No. 20 stainless steel machine screw to attach the grab bar to the toggle anchor. Use the same method to mount grab bars to steel studs. For help finding a Toggler retailer, see the Buyer's Guide on p. 56.
You're Not Done Until You Yank-Test
Give the bars a good solid yank to test their holding power (Photo 8). With a helper standing by in case the bar comes loose, pull with all your strength. Now's the time to make sure the bar will hold up when it's really needed. While you're at it, consider installing grab bars in other key locations. A vertical or angled bar mounted on the wall to the side of the toilet or a vertical bar installed on the side wall in front of the toilet helps getting up or down. The expert we talked to recommended mounting a vertical bar beside the entry door from an attached garage. Usually there isn't a handrail, and negotiating two or three steps with a bag of groceries under your arm is a lot easier and safer with a grab bar to hang on to. Look around and you'll find other spots where grab bars would make everyday tasks safer and easier.
Buying Grab Bars
Grab bars are specially manufactured to hold at least 250 lbs . when properly secured. Towel bars and other light-duty bars are not strong enough.
Most bars are stainless steel to resist corrosion, but you can also find them with a painted finish in a variety of colors. We purchased our 1-1/ 2 in . dia. white grab bars at a home center. The 18-in. bar cost about $30; the 24-in. bar about $40. Thinner bars are available, but a standard 1-1/ 2 in . dia. bar like we're using is just right for most people's grip. Some bars feature added texture to reduce slipping. Here are a few guidelines for selecting grab bars:
- Purchase an 18-in. or longer bar to mount vertically at the tub edge.
- Before you buy a bar to mount at an angle or horizontally on the long tub wall (Photos 1 and 2), locate the studs. Then buy a bar that reaches from one stud to the other, usually 32 in . long for a horizontal bar and 24 in . long for an angled bar.
- Buy standard 1-1/ 2 in . dia. grab bars for most situations. Thinner bars look more like towel bars and may not be strong enough for heavy use.
- Avoid grab bars that leave more than a 1-1/ 2 in . space between the bar and the wall unless there is a specific reason for using one. A person's arm could slip into the extra-wide space and become trapped or break during a fall.
- Ask a physical therapist or an occupational therapist to help select the right bars if you're installing the grab bars for a person with special needs.
Home centers keep a variety of grab bars in stock, but specialty suppliers offer the most complete selection. We've listed a few sources at the end of this article, or check your Yellow Pages under ˇ°Medical Equipment and Supplies.ˇ±
The best way to anchor grab bars to concrete
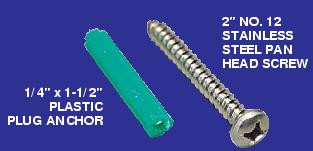
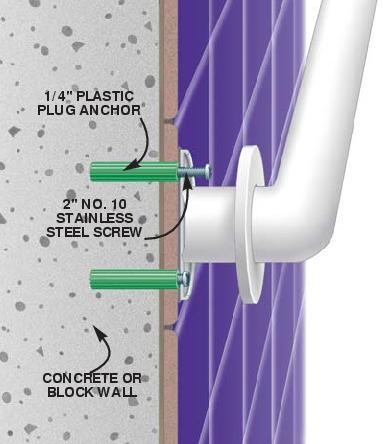
Plastic plug anchors hold screws tight in masonry or concrete. Anchor grab bars to concrete, concrete block or brick with 1/4-in. x 1-1/ 2 in . plastic plug anchors and No. 12 stainless steel pan head screws. Drill a 1/4-in. hole with a masonry bit (you may need a hammer drill for concrete or hard brick). Push the sleeve into the hole and drive in the screw.
Click image to enlarge.
1. Find the studs near your proposed grab bar location using a stud sensor or one of the techniques mentioned in the story. Make a light pencil mark at the center of each stud.
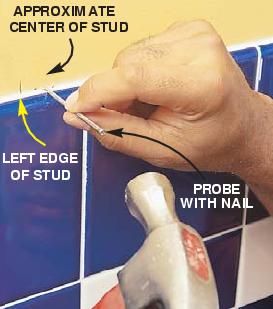
2. Find the edges of the studs by probing with a finish nail. Make a series of holes in an inconspicuous location, like directly above the tile, and mark both edges of the studs.
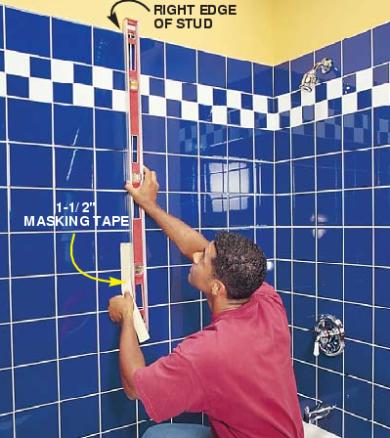
3. Extend the stud marks down to the grab bar location with a level. Place a strip of 1-1/ 2 in . masking tape on the tile to indicate the studs.
Click image to enlarge.
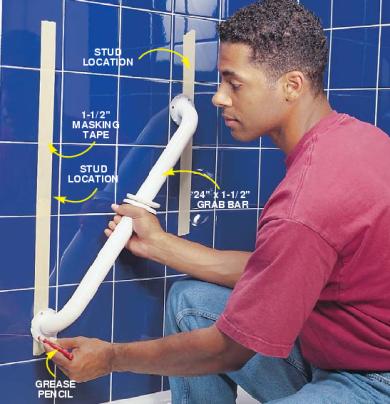
4. Position the grab bar (see ˇ°Positioning Your Grab Bars,ˇ± right) so that at least two of the screw holes align with the studs. Then mark each hole with a grease pencil.

5. Drill a 1/8-in. hole with a glass-and-tile bit at the mark closest to the center of each stud to confirm the stud location. If you hit solid wood, drill the remaining holes. If not, poke a piece of bent wire through the hole and probe until you feel the stud. Reposition the grab bar and mark the holes over the new stud position.

6. Caulk the back of the grab bar mounting flange with tub-and-tile adhesive or silicone caulk.
Click image to enlarge.
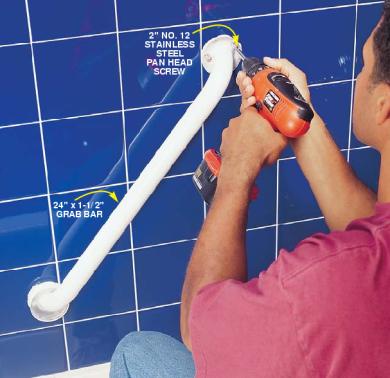
7. Screw the grab bar to the wall with the no. 10 or 12 stainless steel pan head screws supplied with the grab bar. They should penetrate the stud at least 1 in .
Click image to enlarge.
8. Attach a vertical grab bar near the tub edge, following the procedures shown in Photos 1 ¨C 7. The bottom of the bar should be about 32 in . to 38 in . above the floor. Yank both grab bars to test for a strong connection.
|